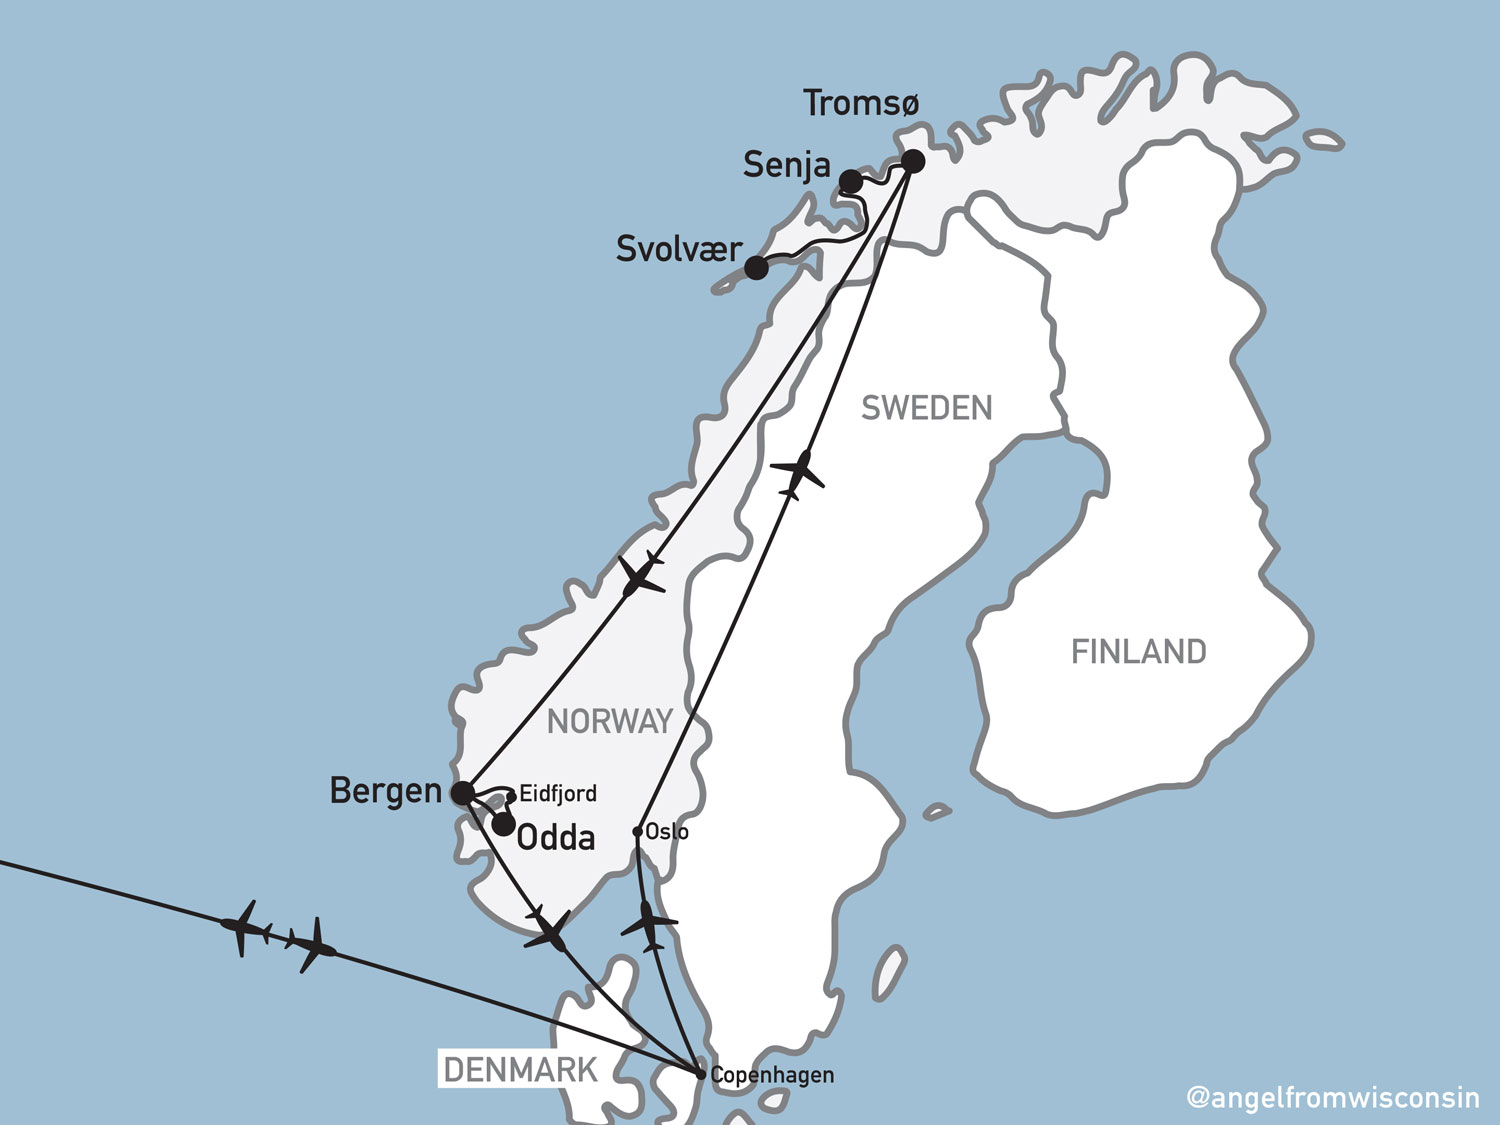
Trolltunga, Norway
05.30.2022
This iconic Norwegian Scenic Hike is now one of the most popular – and instagram worthy – attractions in Norway. It was also on my hiking bucket list and I was thrilled we could include it in our 12 day trip to Norway. We did everything in our power to ensure this was a positive hiking experience which *for me* means avoiding the crowds. My travel companion and I definitely succeeded in this endeavor, we even had the view all to ourselves for a while!
This post is about how we hiked Trolltunga, but there are alternative options which I will share at the end of this post.
Helpful info:
Trailhead: Skjeggedal (P2)
Cost: 500KR/$50USD (P2 parking)
Length: 17 miles out & back
Elevation gain: 2,624 feet
Time: 8.5 hours
Official website: Trolltunga
Plan Ahead
We left our Air BnB in Odda at 4:30am and started hiking by 5:15am. We had to park our rental car at P2 Skjeggedal parking because the P3 Mågelitopp parking (and shuttle) would not be opening for the busy summer season for another 4 days. Had the P3 parking or shuttle been open, it would have removed 17 paved switchbacks and 1,312ft of elevation gain from our hike. However, hiking the switchbacks wasn’t that bad as it was a cool morning and this helped to keep us warm, plus, it was probably one of the biggest deterrents to the crowds we were so eager to avoid. There were only a handful of cars in the parking lot when we arrived and a few of them had obviously been parked there over night, presumable for those camping on the mountain.
Confused about the parking options? Check out the map on the official Trolltunga website.


Once we got to the P3 Mågelitopp, hiking was relatively flat as we carefully traversed over the smooth flat rocks that were, unfortunately, coated in thin layers of ice. This was maybe the most hazardous stretch of the hike for us. Obviously as the day warmed up, it would just be shallow flowing water but in the cool morning, it was dangerous ice.


Mind over Matter
Next we reached the second ascent of the hike which consisted mainly of large rock steps and some rock scrambling. It was this stretch of the trail where we met the only two other groups of hikers for our entire hike in. Once we had this ascent behind us, the trail in front of us became much more flat but the higher elevation also meant the rest of our hike would be on a snowy path. The cool morning meant the snow was firm to walk on rather than soft, slushy snow that was slower to move through. I was personally surprised how much snow still remained!

We pressed on through the snow, past the emergency shelters, past a few tent campers, and over a few rivers of snowmelt. When the trail started to finally open up to views of the fjord, it gave us fresh motivation to continue along the last few miles to the only reason people hike this hike; the view and photo opportunity on the “trolls tongue” rock outcropping at the very end.

The Half-Way Point and the Finish Line
Then, there it was, the iconic rock form jutting out into its surreal surroundings. It looked totally fake, both in pictures and in real life. To get down to the trolls tongue there are a few metal rungs to climb down and then a few rocks to trip over before walking out on the ledge. It’s very wide so it’s easy to feel safe so long as it is ice free. Fortunately for us, it was dry and we took our time capturing our cinematic moment after the long hike to get there. We even had the entire outcropping and viewing area to ourselves for 10 or so minutes until the next couple of hikers came along.
We had planned on spending much more time here, watching others take their pictures and whatnot but, unfortunately, the weather was starting to turn. It had been getting progressively more cloudy our entire hike in and the wind became bitingly cold when we got to the exposed area around Trolltunga. Plus, we knew there was a chance of rain in the afternoon and becoming soaked and cold did not seem like a safe idea. So, after too short of a time marveling at Trolltunga and the beautiful view around us, we packed up and started the long hike back.


On the hike back, we started to meet a steady flow of hikers on their way in. Some were properly outfitted with jackets, hats, and boots, others were not, wearing flat bottomed shoes, low cut cotton socks, and hoodies. Please hike prepared with plenty of water, waterproof footwear, and layers of non-cotton clothing! We also met friendly dogs having the time of their life and we even saw one guy who had the foresight to bring his cross country skis! We were nearly back to the switchbacks before we saw our first large group of guided hikers beginning their journey.
Note: There are no restrooms or trash cans along the trail.
Clearly, doing this hike just days before the P3 shuttle started running was not a popular time. The P2 parking lot wasn’t even half full when we returned. Hiking with a guide is recommend until June 1st but the trail was so well marked and clearly defined this late in the off-season, there was truly no need for experienced hikers to have one.

Other Options
If you also want to visit Trolltunga, there are several other options besides hiking on your own.
Please visit the official Trolltunga website for current information and all of the fine-print on rules, booking, and pricing. If snowshoeing to Trolltunga in the winter, staying overnight by camping on the mountain, or doing an adventurous bike, climb, and hike loop sounds like something you would enjoy, I encourage you to explore their site by clicking here! This site also offers some nicely detailed maps!